Bread Baking is a fantastic way to teach your kids math and science at home:
- Measurements
- Count number of cups OR do the math to change measurements into weights
- If 1 cup flour weighs 120 gm, what is the weight of 5 cups?
- If you are doubling a recipe, kids can do the math on paper or with a calculator.
- Count number of cups OR do the math to change measurements into weights
- Number of servings a recipe makes—this is an especially good way work on translating English to Metric measurements!
- Weigh your loaves of bread in ounces or grams
- Consider 1 serving to be 1-1/2 ounces (42.5 gm).
- If you have 48 ounces of bread (1362) grams) of bread, how many servings do you have.
- 48 oz divided by 1.5oz/serving = 32 servings
- 1362 gm divided by 42.5oz/serving = 32 servings
- Science
- What happens to the flour when you mix it with water?
- It soaks up the water and becomes dough
- What happens to the dough as you knead it?
- The protein in the flour develops into long strands that give the bread structure.
- What happens to the dough after you have mixed it with yeast and left it in the bowl to rise?
- The yeast grows, as it grows it produces carbon dioxide, which causes the bread to rise
- The gluten strands in the flour stretch more as the dough rises. That allows the bread to hold its shape.
- What happens to the bread as it bakes?
- It continues to rise
- the yeast continues to produce carbon dioxide during the first part of baking
- the strands of yeast continue to get longer
- the dough dries out with the heat and becomes BREAD!
- It turns brown.
- The reaction is called the “maillard reaction”.
- Heat + protein + sugars in dough cause the dough to brown.
- Same thing happens when you toast bread or bake anything that contains sugar and protein.
- The reaction is called the “maillard reaction”.
- It continues to rise
- What happens to the flour when you mix it with water?
Why use whole wheat instead of white flour?
- When we eat breads made from whole grain flours, we get all the great nutritional value from the whole grain.
- Check out the nutritional values label on whole wheat vs white flour.
- Not all of the nutrients in the whole grain wheat are shown, but the label gives you a hint of what you are getting in whole wheat vs white flour:
- 366% as much iron and potassium
- 300% as much fiber
- B vitamins that are removed when flour is refined into white flour.
- White flour typically has some of these vitamins added back

Nutrition label from whole wheat flour. Note the fiber, iron and potassium values.

-
Whole grain bread is better for a person with diabetes or prediabetes!
- Higher in fiber than white bread
- Higher fiber carbs do not raise your blood glucose as fast as refined carbs do
- 100% whole grain bread has a lower “glycemic index” than white bread.
- 100% whole grain bread glycemic index in the 50’s
- White bread glycemic index in the 70’s
- 100% whole grain bread has a lower “glycemic index” than white bread.
- Higher fiber carbs do not raise your blood glucose as fast as refined carbs do
- Higher in fiber than white bread
There are two types of “Whole Wheat Flour” that you can get in most grocery stores.
- The most common is labeled simply “Whole Wheat Flour”.
- Made from hard red winter wheat, the most common variety of wheat used for flour
- Another WHOLE WHEAT FLOUR is “White Wheat Flour”
- Made from a different wheat variety hard OR soft white wheat
- Do not confuse with “white flour”—white whole wheat flour is made from the whole grain, it is not refined


- The difference is the flavor
- White whole wheat flour has a more mild flavor.
- I use the two flours interchangably.
- I often use 50% of each type when I’m making bread.
How can I get my whole wheat bread to rise like white bread?
-
Whole wheat bread can be very dense.
- The bran and germ in the whole grain keep the gluten from rising as it does in white flour.
- The protein gluten (a combination of “gliadin” and “glutenin”) is what gives breads and other baked goods their “spongy” texture.
- Add some “Vital Wheat Gluten”, your bread will rise just fine.
- I use 1/4 – 1/2 cup in a recipe for 2 loaves of bread.
- I do this in regular sandwich bread as well as sour dough or french bread.
- This makes my bread about 90-95% whole grain.

Whole Grain Bread Recipe
I am giving you a very basic recipe with options for some variations. I use my heavy duty “Kitchen Aid” stand mixer, with a dough hook to do the majority of the mixing. This makes the process easier than if I am doing everything by hand.
You can do everything by hand if you don’t have a heavy duty mixer!
-
Whole wheat flour total: 5 3/4 to 6 cups, divided (you may need a little more depending on humidity in your kitchen)
- Up to 1 cup flour can be substituted with another grain or seed (e.g. rolled oats OR oats ground into flour in your blender; rye flour, ground flax seed, chia seeds, rice flour, cooked and cooled millet—be creative!)
-
1/4 cup Vital Wheat Gluten
-
2 cups warm liquid (110 to 120 degrees); you may need a little extra liquid if humidity is very low
-
Water or milk are most commonly used, but you could use broth, water left over from cooking potatoes or vegetables or even fruit juice if you want a sweeter bread
-
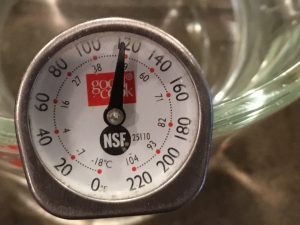
It is good to check the temperature of your liquid to make sure it is in the range that helps yeast to grow, but doesn’t kill it. When I am adding flour, sweetener and oil to the liquid before I add the yeast, I go with the top end of the range (110-120 degrees F)
-

-
(Optional) 1/3 to 1/2 cup sweetener: honey, molasses, maple syrup, white or brown sugar.
- Sweetener helps bread retain moisture and adds flavor.
- I like using 1/4 cup honey and 1/4 cup molasses
-
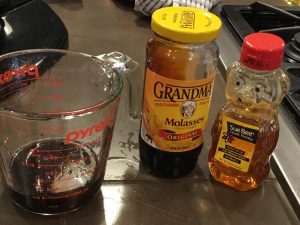
A combination of honey and molasses gives bread a very nice flavor, especially when using some rye flour and oats.
- 1/3 to 1/2 cup oil:
- canola oil, corn oil, safflower oil, olive oil, melted butter—you could even use melted lard.
- For a heart healthy bread I typically use Canola oil or Olive oil
-
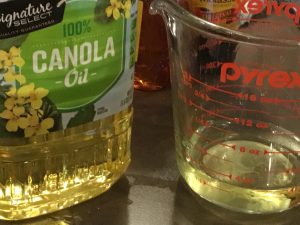
Canola oil is heart healthy becuase it is a polyunsaturated fat that contains omega 3 fatty acids. Poly-unsatruated fats help lower blood cholesterol. Eating more omega 3 fatty acids has been linked to a lower incidence of heart disease.
-
2 tablespoons or 2 packets dry yeast
-
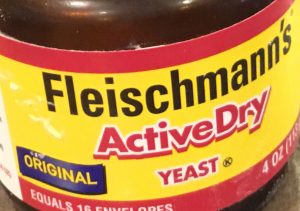
If you make bread often, it is more economical to buy yeast in a jar, otherwise buy it in individual packets. Once your jar of yeast is open, storeit in the refridgerator. Make sure you use it by its expiration date!
-
-
1 tbsp salt
- Very important for both flavor and texture of bread


Directions:
- Place warm liquid + oil, sweetner and 2 cups whole wheat flour in a large mixing bowl. Let this sit for about 15 minutes (this helps soften the bran in the whole wheat flour)
- Add the yeast and stir OR mix on your mixers “stir” setting for 30 seconds.
-
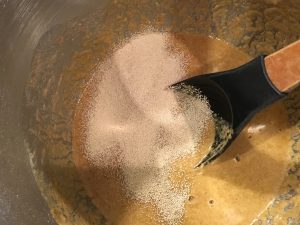
Yeast added to flour, liquid, sweetener and oil. Another way to do the yeast is to put in into about 1/4 cup water with 1/2 teaspoon sugar and allow it to sit for a few minutes until it is frothy. Then add it to your flour and liquid. 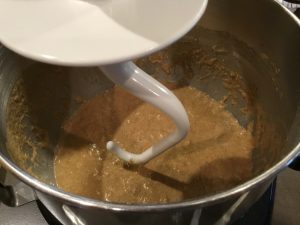
Using an electric mixer makes the mixing and initial kneading of bread very easy.
-
- In a separate large bowl, stir together the Vital Wheat Gluten, 3 1/4 cups whole wheat flour, OR 2 1/4 cup whole wheat flour + 1 cup of whatever other flours or grains you are adding. Mix this into the above mixture, makin sure all the flour is combined with the liquid. Stir or mix for about 40 seconds.
- Add the salt
- Continue to stir or mix the dough until it starts to form a ball and is still slightly sticky, adding flour 1/4 cup at a time as needed to get the dough to form a slightly sticky ball (you may need 3/4 cup additional flour, again it depends on humidity—I find that the amount I add varies every time I make bread)
- Coat your hands with flour and then place the dough on a lightly floured board (any hard surface will do). Sprinkle 2 to 4 tablespoons of flour on the top of the dough and knead it lightly. Use the palms of your hands to stretch the dough and then fold it until you have a nice tight ball. (This shouldn’t take more than 5 minutes)
- Place the dough in a large bowl that has been greased. Turn the dough over in the bowl so that the dough is greased.
- Cover the dough with plastic wrap and then place a towel over the bowl and let raise until almost double in size.
-
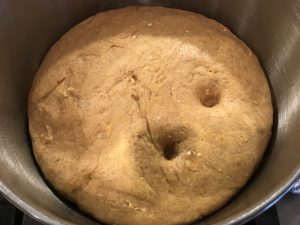
You know your dough has risen enough when you poke your fingers into it and it does not spring back.
-
- Place the risen dough on your lightly floured board and gently press the air out of the dough and form a ball.
- Cut the dough in half and form each half into a tight “log”.
- One way to do this is to roll the dough out and fold it into a log; important to make sure that it is very tight so that you don’t end up with a hole in the middle of your loaf.
- Place each log of bread dough in a greased loaf pan.
-
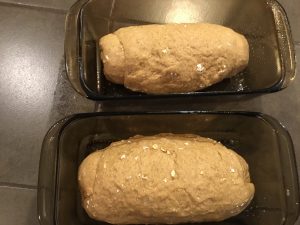
Final rising of dough will be in loaf pan or on a sheet pan if you are making it into different shapes. Cover with plastic wrap, topped with a cloth towel and allow to rise until just above the top of the pan, or until almost double in size. - If you don’t want your bread in loaves, you can shape it however you want to.
- It is fun to give each of your kids some dough to make into their own unique design!
- You can also divide each loaf into 3 long strands to make a braid. Be creative!
- Allow the dough to rise until it is just above the top of your loaf pans, or if no using loaf pans, until not quite double in size.
- Preheat oven to 350 degrees F about 15 minutes before it is done rising.
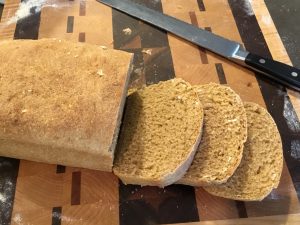
- Bake for 35 to 40 minutes. If making smaller loaves or shapes of bread, it will take less time. Bake for about 20 minutes and then check frequently. Bread is done when it is browned on top and it makes a hollow sound when you tap the bottom of it.
- Placed finished bread on a wire or wooden rack and allow it to cool before cutting
- Many recipes say to let it cool completely, I find that if I let it cool for about 20 minutes, it is still warm, but easy to slice—what is better than a warm slice of fresh bread?